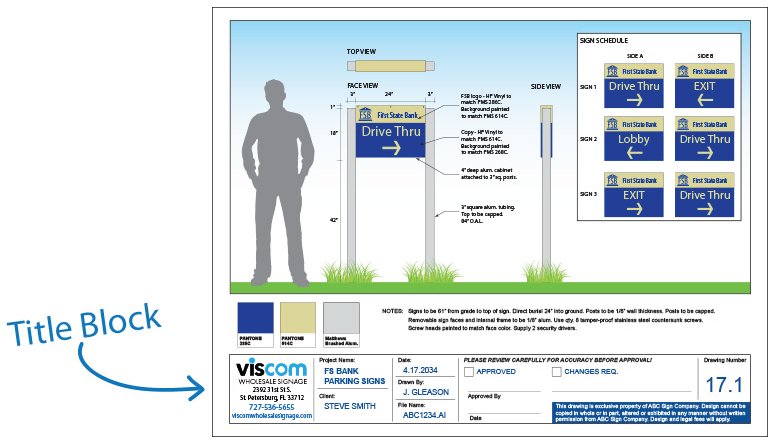
Its amazing what a new pair of awesome shoes can do for your overall look. When they look great, it seems everyone notices and whatever else you happen to have on seems to look a little better too. To quote Coco Chanel, “A woman with good shoes is never ugly.” This same concept applies to the drawings you present to your client to sell a sign. How, you ask???
When it comes to increasing sign sales, one of the easiest, and least expensive things you can do is make your initial sign drawings look as professional as possible and put your best foot forward (pun intended).
As a wholesale manufacturer, we have seen all types of production drawings from our clients, many of them being the same drawings that were used to present the initial sign concept to their customer. Statistically, our customers with the better looking drawings seem to close more sign sales. This is just a simple fact. After doing a bit of personal research into the more successful ones, I noticed one thing they ALL had in common. Its the shoes!!!
When it comes to conveying a sense of professionalism to your potential client, the better your initial drawings look, the more comfortable your client will be right off the cuff. The easiest thing you can add to ANY of your drawings is a great looking pair of shoes, or what is better known as a title block. A title block just adds that extra “kick” to your presentation (OK, I’ll stop).
Obviously, creating killer drawings may take a bit of an investment in time and effort, but since you are here reading this, team Viscom is going to save you some time right off the bat. This one little thing (its the shoes) can make a huge difference in your sales effort, and best of all, we already did most of the work for you. More on this later…

So what is a title block? This is the section of your drawing that has pertinent information about the drawing you are presenting. It not only looks professional, it gives you and your client relevant information that you both need. The reason for the shoe reference is that most of the drawings that come across our desk have a title block on the bottom of the drawing, however some are on the side and some are spread across the bottom and side. Just like something as subtle as a new pair of awesome shoes can improve your overall look, a title block makes the overall look of your presentation drawing that much better. No matter how you implement the title block, just by adding one to your drawings can make a huge difference in your client’s initial perception of your ability to accomplish his goal. So, as Nike says, “just do it” (Jeez, not another shoe reference, sorry).
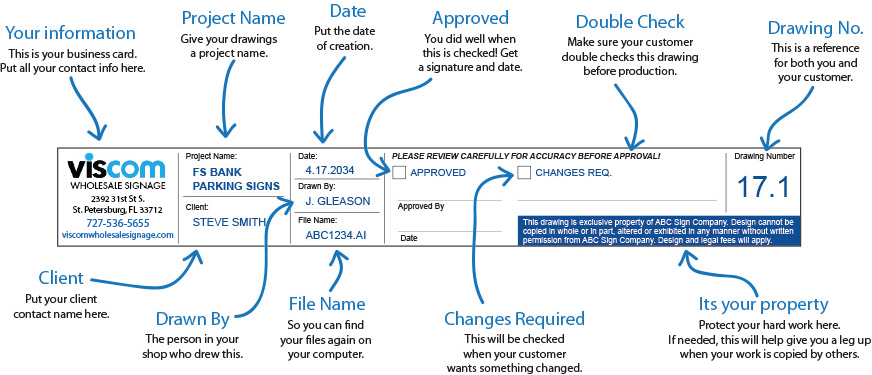
Below is a typical title block, and what should be included therein. Before you ask, the items that are included in this simple example are exactly that, an example. You can add or delete anything to make it just the way you like, nothing here is etched in stone.

This particular example is pretty generic, but very functional. It contains most of the pertinent information that you and your client need to keep track of the drawing. Any and all of the items listed can be changed to your liking to make it your own. For example, if your project has more than one page, you could change the drawing number field to page number and use “page 2 of 13”, etc. You can add a field to keep track of revisions. If you want, you could do some research on the legal disclaimer and change it to what works for you and your location. Add some cool graduated backgrounds, or some new fonts, its all up to your personal taste.
One really cool aspect of this title block is something that is commonly known as a “call to action”. If you did a pretty decent job of putting together a good representation of what your client is after from the get-go (maybe you didn’t, but don’t worry), your client is somewhat inclined to put a check mark in the “approved” box, or he’ll check “changes required”. How cool is that! You have engaged your client to look over your work and make a decision about YOUR WORK. So a check mark in the “approved” box is great, but a check mark in the “changes required” box gives you a second (or third, or fourth) chance to again engage your client to make the changes he wants to the sign he will now probably order from you. Now your kind of a “shoe in” for the job. (Alright, that’s the last one, I promise). The little title block did its job, in more ways than one, and now you have a “leg up” (I lied) on sealing the deal.
If you are an awesome subscriber to VisComNews, you can download 4 versions of the above title block for your own use absolutely FREE. Included is a horizontal and vertical format version for both letter and tabloid size paper. Just download the file and simply swap out the “your information” block with your logo and contact info, copy and paste it to your drawing, fill out the other fields, and you’re off and running (you can’t stop me). Don’t forget to swap out your company name in the legal disclaimer. Make any changes you want to personalize it or leave it as is, but either way, we suggest you always use a title block, from our experience, it does make a difference.

